SleepNon24LightSensorNotes
Créée le jeudi 22 octobre 2020
Best vendors: mchobby.be and mouser.be
BEST FINAL LIGHT LUX AND SPECTROMETER (COLOR) SENSOR DIY:
- Adafruit Feather M0 DataLogger - ATSAMD21 25€ at mchobby.be https://shop.mchobby.be/fr/feather-adafruit/829-feather-m0-datalogger-atsamd21-3232100008298-adafruit.html?search_query=Adalogger&results=2
- supports CircuitPython! https://circuitpython.readthedocs.io/en/latest/shared-bindings/support_matrix.html
- CircuitPython can run as a kernel inside Jupyter Notebook, hence can prototype interactively the board! https://cleoqc.wordpress.com/2019/02/24/jupyter-notebook-and-circuitpython/
- https://circuitpython.readthedocs.io/en/latest/shared-bindings/sdcardio/index.html
- https://learn.adafruit.com/adafruit-micro-sd-breakout-board-card-tutorial/circuitpython
- TUTO: https://learn.adafruit.com/adafruit-feather-m0-adalogger/
- Alternative: ItsyBitsy even smaller than Feather: https://learn.adafruit.com/introducting-itsy-bitsy-32u4 -- with small charger: https://learn.adafruit.com/infinity-mirror-coaster/lipo-backpack-wiring
- Alternative: Adafruit Feather M0 Express - Designed for CircuitPython https://learn.adafruit.com/adafruit-feather-m0-express-designed-for-circuit-python-circuitpython et https://shop.mchobby.be/fr/feather-adafruit/1119-feather-m0-express-atsamd21-cortex-m0-circuitpython-3232100011199-adafruit.html
- à combiner avec: https://shop.mchobby.be/fr/feather-adafruit/1056-adalogger-featherwing-rtc-pcf8523-microsd-3232100010567-adafruit.html
- only this featherwing has a RTC and microSD combined, else the Feather M0 Datalogger does not have RTC - NO, Adalogger M0 do have RTC! https://circuitpython.readthedocs.io/en/latest/shared-bindings/support_matrix.html
- Is RTC (real time clock) necessary? https://learn.adafruit.com/adafruit-adalogger-featherwing/using-the-real-time-clock
- Alternative: ESP32, includes bluetooth, wifi and sd card: https://www.instructables.com/ESP32-BLE-Android-App-Arduino-IDE-AWESOME/?amp_page=true
- Board was made in 2020, compatible with MicroPython: https://makeradvisor.com/esp32-development-boards-review-comparison/
- Adafruit esp32 highest quality with lipoly charger (and maybe with CircuitPython?)
- NO: the BLE shares the connection with Wifi so it consumes way too much battery! 10x more than others! https://www.esp32.com/viewtopic.php?t=13963 — but might be fixed in the future: https://github.com/espressif/esp-idf/issues/947#issuecomment-500312453
- https://randomnerdtutorials.com/esp32-data-logging-temperature-to-microsd-card/
- https://stackoverflow.com/questions/23049137/bluetooth-low-energy-devices-go-to-deep-sleep-in-transactions/23077940
- https://hal.archives-ouvertes.fr/hal-01775064/document
- BLE Bluetooth lower consumption than ANT+ and ZigBee https://www.researchgate.net/publication/261478466_Power_consumption_analysis_of_Bluetooth_Low_Energy_ZigBee_and_ANT_sensor_nodes_in_a_cyclic_sleep_scenario
- https://www.adafruit.com/product/3405
- BEST Alternative: Adafruit Feather nRF52840 Express (nRF52840) https://learn.adafruit.com/adafruit-feather/bluetooth-feathers
- with low-profile Bluetooth, can act as central (like a phone connecting to a device - perfect for heart rate monitor in combination with Polar H10)
- compatible with Circuit Python
- Can add the microsd adalogger featherwing for microsd card logging + RTC
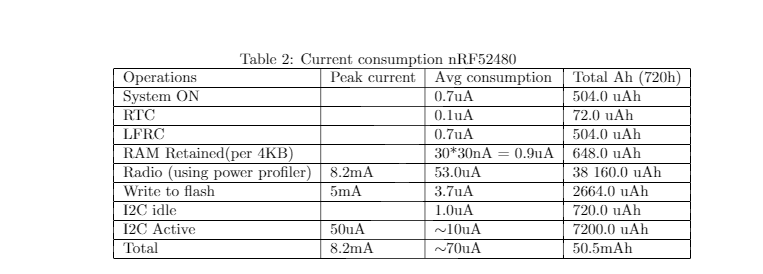
- power consumption 10ua/h! Single chipset doing both Bluetooth and the main processing! https://devzone.nordicsemi.com/cfs-file/__key/communityserver-discussions-components-files/4/nRF52840_5F00_currentconsumption.PNG (mirror: .\nRF52840_currentconsumption.PNG )
- nRF52840 supports Bluetooth 5.2!
- Likely lower consumption than PyBoard D but need to solder the Adafruit Featherwing myself (although yes it is compatible it was tested).
- BEST ALTERNATIVE: pyBoard D, tout en un avec micro SD card et Bluetooth LE
- https://shop.mchobby.be/fr/micropython/1467-pyboard-d-sf6w-stm32f767-wifi-et-bluetooth-3232100014671.html
- has RTC
- has Bluetooth 4.1 (LE only, classic in the future)
- supports MicroPython
- low battery consumption: https://forum.micropython.org/viewtopic.php?t=7084
- https://github.com/peterhinch/micropython-micropower/blob/master/HARDWARE.md — supports for pyboard D https://github.com/peterhinch/micropython-micropower
- "The Pyboard can be used to build systems with extremely low power consumption, and it is possible to build systems capable of running for over a year on standard batteries such as AA cells or even coin cells. With the Pyboard 1.x series, achieving the lowest possible power consumption where peripheral devices are attached requires a little additional hardware. The Pyboard D overcomes this requirement by virtue of a software switchable 3.3V regulator which also powers the I2C pullups. Broadly there are two approaches, depending on the acceptable level of power consumption. If an idle current in the range of 500uA to 1mA is acceptable, code can be largely conventional with pyb.stop() being employed to reduce power consumption during periods when the Pyboard is idle."
- to test power consumption: https://www.aliexpress.com/item/32855845265.html
- Bluetooth now supported in PyBoard D and MicroPython: https://forum.micropython.org/viewtopic.php?t=6274
- BLE-only (no classic bluetooth) but supports central bluetooth (acting as a phone to receive data): https://github.com/micropython/micropython/blob/v1.13/examples/bluetooth/ble_simple_central.py
- https://docs.micropython.org/en/latest/library/ubluetooth.html
- Dimensions: about 2x4cm : https://hackaday.com/2019/03/20/new-part-day-pyboard-d-is-smaller-wireless-and-has-expansion-modules/
- https://blog.nordicsemi.com/getconnected/the-difference-between-classic-bluetooth-and-bluetooth-low-energy
- BLE is low consumption but slow: https://www.thedroidsonroids.com/blog/bluetooth-classic-vs-bluetooth-low-energy-ble
- Polar H10 battery duration is 400h with both BLE and 5GHz enabled! If only BLE with 2.4GHz (smartphone), then maybe twice the battery? https://www.polar.com/blog/new-polar-h10-heart-rate-sensor-2017/ — also confirms that the internal memory offline recording can only be started through the Polar Beat app at the moment
- Polar Beat can update Polar H10 firmware: https://support.polar.com/be-fr/support/how_can_i_update_polar_h10
- "Direction finding is a major feature of Bluetooth 5.1, which brings the possibility of absolute positioning of products and things in three-dimensional space to the world of low-power wireless connectivity. [...] Real-Time Location Services (RTLS) using Bluetooth have been available for a few years now. This became possible with the introduction of Bluetooth beacons, which could give an approximation of distance, or proximity, between objects." https://blog.nordicsemi.com/getconnected/bluetooth-5.1-puts-bluetooth-in-its-place
- supports CircuitPython! https://circuitpython.readthedocs.io/en/latest/shared-bindings/support_matrix.html
- LiPo batteries?
- BEST SUMMARY:
- NIMh can sustain much higher temperature than Lipo (NIMh used for surgical devices), but for my use LiPo should be fine because human is wearing it so unlikely to reach max temperature 60-80°C
- But for added security:
- Use polyimide tape (kapton tape) to insulate battery by wrapping it several times inside
- Get a LiPo battery with temperature control in the protection control board (lipo thermistance)
- Peut aussi acheter des dissipateur d'énergie thermique en céramique? À coller sur le film poliymide? https://shop.mchobby.be/fr/raspberry-pi-3/314-dissipateur-de-chaleur-pour-raspberry-3232100003149.html
- WARNINGS: https://www.youtube.com/watch?v=8Cmq5H1ziOE
- exposed to sunlight! So how to avoid issues?
- interesting proof of concept, but solar panel is likely large, not small enough for a pendent: Self-Powered, Ambient Light Sensor Using bq25504 https://www.ti.com/lit/an/slua629a/slua629a.pdf?ts=1601376012985&ref_url=https%253A%252F%252Fwww.google.com%252F
- NIMh batteries safer for sunlight exposure: "The operating temperature range for NiMH cells has been extended to over 100 °C (-30 °C to + 75 °C) which far exceeds the temperature range currently achievable by Lithium cells making NiMH technology ideal for automotive use. NiMH can handle the high power levels typical in EV applications, the active chemicals are inherently safer than Lithium based cells and NiMH batteries don't need the complex battery management systems (BMS) essential with Lithium batteries." https://www.mpoweruk.com/nimh.htm
- But LiPo fine up to 60°C, and since the pendant is made to be worn, it's impossible a human can sustain such a high temperature, so the LiPo battery will never be exposed to such a high temperature in practice: https://www.rctech.net/forum/electric-off-road/453610-bad-if-lipo-battery-gets-warm.html
- BESTTUTO: https://learn.adafruit.com/li-ion-and-lipoly-batteries/overview and https://learn.adafruit.com/li-ion-and-lipoly-batteries/rechargeable-lithiums-names LiPo vs LiCo vs NIMh
- "For example, almost all lithium polymer batteries are 3.7V or 4.2V batteries. What this means is that the maximum voltage of the cell is 4.2v and that the "nominal" (average) voltage is 3.7V. As the battery is used, the voltage will drop lower and lower until the minimum which is around 3.0V. You should see the number 3.7V written on the battery itself somewhere."
- "For example, here is a profile of the voltage for a 'classic' 3.7V/4.2V battery. The voltage starts at 4.2 maximum and quickly drops down to about 3.7V for the majority of the battery life. Once you hit 3.4V the battery is dead and at 3.0V the cutoff circuitry disconnects the battery (more on that later."
- "Make sure when you're buying batteries and chargers to match them up! Overcharging a 3.6V battery by attaching it to a 4.2V battery charger can at the very least permanently damage your battery and at worst cause a fire!" --> "When charging batteries you must make sure that the charger voltage is less than or equal to the battery voltage. For the best battery performance/life you should have them matched. For example: 3.7/4.2V battery and 3.7/4.2V charger: OK - 3.7/4.2V battery and 3.6/4.1V charger: OK (but not ideal) - 3.6/4.1V battery and 3.6/4.1V charger: OK - 3.6/4.1V battery and 3.7/4.2V charger NOT OK!"
- "Lithium ion/polymer batteries are extremely power dense. This makes them great for reducing size and weight of projects. However, they are not 'safe' batteries and require extra care. Charging or using the batteries incorrectly can cause explosion or fire (as shown by this and many other youtube videos)."
- TODO CRITICAL: tester pendant exposition au soleil SANS LE PORTER en mettant dans le parking au soleil
- WHAT NOT TO DO: do NOT recharge when too hot, so not under the sun, but otherwise should be fine even if exposed to relatively high temperatures (as long as acceptable by the human wearing it), if not recharging the battery should sustain the temperature: https://learn.adafruit.com/li-ion-and-lipoly-batteries/protection-circuitry?embeds=allow
- ALWAYS CHECK if protection board attached to the battery (not the charger!): "For specifics on each battery you must look at the datasheet to know what the safe voltages, currents and temperatures are - they can vary from cell to cell. For the first 3 items, a circuit board attached to the battery can monitor the battery voltage and the current going out. These are often referred to simply as protection circuits. They are very common on standard batteries but you must check the datasheet or product image to verify that a protection circuit is attached" https://learn.adafruit.com/li-ion-and-lipoly-batteries/protection-circuitry?embeds=allow
- use regular/normal cells, NOT RC (radio control) batteries because the latter are unsafe and unnecessary for this project: https://learn.adafruit.com/li-ion-and-lipoly-batteries/rc-type-batteries
- can use hard shell camcorder and phone batteries: https://learn.adafruit.com/li-ion-and-lipoly-batteries/cell-phone-and-camcorder-batteries
- never make DIY parallel or serial batteries, buy a preassembled pack or better a larger single battery: https://learn.adafruit.com/li-ion-and-lipoly-batteries/multi-battery-packs
- "Important Note! Never charge a battery faster than 1C (so a 1300mAh battery should be charged at under 1300 mA) and we suggest staying at or below 0.5C Check the datasheet of the battery for more information about your cell" https://learn.adafruit.com/li-ion-and-lipoly-batteries/proper-charging
- Other warnings: https://learn.adafruit.com/li-ion-and-lipoly-batteries/conclusion
- "Do NOT use or leave the battery in a high temperature environment (for example, under direct sunlight or in a vehicle in hot weather). Failure to take this precaution can lead to overheating of battery and/or fire or explosion. Also, performance of battery will degrade and lifetime will be reduced."
- "In case the battery terminals are dirty, clean the terminals with a dry cloth before use. Otherwise, poor performance may occur due to the poor connection with the instrument or device."
- "Be aware that discarded batteries may cause fire or explosion. Therefore, apply a non-conductive tape to the battery terminals to insulate them before discarding."
- "It the battery gives off an odor, generates heat, becomes discolored or deformed, or in any way appears abnormal during use, recharging, or storage, immediately remove it from the device or battery charger and stop using it."
- "Temp sensor FAQ: Most DIY/hobbyist chargers don't come with temperature sensors built in because they are not always right next to your battery and they are intended to be used at low charge rates and indoors where the temperature is around 25 degrees C. If you want to charge your batteries at high rates (above 0.5C) or outdoors, you should get a temperature-based charging solution."
- BEST PAPER: about temperature maximum ranges for NIMh and LiPo, and NIMh can withstand much more temperature than LiPo: "Batteries Must Perform in Extreme Temperatures" by Dr. Robin Sarah Tichy 2007 http://www.batterypoweronline.com/images/PDFs_articles_whitepaper_appros/MicroPowerBatteriesExtreme.pdf
- "Batteries for handheld surgical tools are exposed to a temperature extremes far beyond the cell manufacturer's recommendation. The tools and battery packs must be autoclaved, and withstand temperatures up to 137°C and are impermeable to 30 psi of superheated steam and they must have a battery that allows the surgeon enough run time and power to complete major orthopedic procedures. A surgical tool battery pack is specially designed to survive the extreme conditions of an autoclave with minimal deterioration in performance. For this application NiMH cells are used. The plastic housing is a glass blend that will help it to withstand the heat and the pieces are sealed"
- NIMh vs LiPo batteries:
- "NiMH batteries are easier to use. They must be fully discharged before charging and must be charged full before storing (Unless Manufacturer tells otherwise. Exampl. Traxxas). NiMH battery chargers are also very simple." https://www.genstattu.com/blog/the-difference-between-lipo-and-nimh/
- "LiPo batteries don’t have to be fully discharged and they must be stored with a 50−70 % charge level. The charging must be done with a charger with balance charging. It is good to charge and store LiPo batteries in a LiPo safe bag."
- "The weight/power ratio in LiPo batteries is significantly better. LiPo batteries are noticeably lighter and they can store the same amount or more energy relative to their capacity than NiMH batteries. The power output of LiPo batteries is greater in quality and quantity. The power output of LiPo batteries is steady throughout the discharge, whereas the power output of NiMH batteries starts to decrease soon after charging because of higher discharge rate of the battery type."
- "There is a fire threat, LiPo is much more unsteady and a nicked battery can cause a fire. LiPo is much more effort-intensive. You need to charge them, discharge them, and store them with the paramount care. Keeping the LiPo can cost a significant amount of money as one needs the right equipment to maintain for them. If the battery is not kept accurately or if it comes to be impaired and punctured, a fire could occur. They have an undersized lifespan. It is best if one doesn’t completely discharge the NiMH battery. It is recommended not to discharge the battery fully in an attempt to make them last longer as this can actually shorten the life of the cells if you do discharge the product regularly. The best method to store a NiMH battery is at room temperature in a dry setting to certify that they don’t get too hot and lead to the reduction of the life of your NiMH battery. After spending their lifespan they are easy to dispose of, NiMH batteries are recyclable." https://blog.ampow.com/lipo-vs-nimh/#LiPo_vs_NiMH_safety
- BEST CRITICAL: From Adafruit discord:
- BEST SUMMARY:
I think a LiPo cell would be fine. If a person is wearing it, it's not going to get too hot, and they would presumably notice if it started to swell up or something.
lrq3000Aujourd’hui à 14:06
ok thank you @madbodger yes that's my reasoning, since lipo can operate up to 60°C usually, it's unlikely even this temperature will be reached since a person will be wearing it
but maybe I can take some additional precautions? Are there techniques to insulate the battery (such as with a tape)?
I'm really new to boards :confused:
interesting read btw on the topic: http://www.batterypoweronline.com/images/PDFs_articles_whitepaper_appros/MicroPowerBatteriesExtreme.pdf
madbodgerAujourd’hui à 14:13
You could add polyimide tape or make sure its protection circuitry included a temperature sensor.
There's this interesting writeup of how you can get skin burns from even low voltage, but I doubt you're going to have any exposed wiring. https://www.sparkfun.com/news/1513
- polyimide tape = kapton
- https://en.wikipedia.org/wiki/Kapton
- "Kapton-insulated electrical wiring has been widely used in civil and military aircraft because it is lighter than other insulators and has good insulating and temperature characteristics. However, Kapton insulation ages poorly: an FAA study shows degradation in hot, humid environments,[5] or in the presence of seawater. It was found to have very poor resistance to mechanical wear, mainly abrasion within cable harnesses due to aircraft movement."
- "Due to its large range of temperature stability, and its electrical isolation ability, Kapton tape is usually used in electronic manufacturing as an insulation and protection layer on electrostatic sensitive and fragile components. As it can sustain the temperature needed for a reflow soldering operation, its protection is available throughout the whole production process, and Kapton is often still present in the final consumer product."
- "Kapton and ABS adhere to each other very well, which has led to widespread use of Kapton as a build surface for 3D printers. Kapton is laid down on a flat surface and the ABS is extruded onto the Kapton surface."
- http://budgetlightforum.com/node/20258 and https://www.rcgroups.com/forums/showthread.php?677844-kapton-Tape
- "Actually Kapton is really tough stuff, tougher than almost any shrink wrap. I wouldnt mind wrapping a battery with it."
- can do multiple turns to be more scratch/tear resistant
- Casing:
- need to be transparent
- BEST IDEA: take a casing that filters UV light, so that it is less hot for the battery
https://store.micropython.org/pyb-features
https://learn.adafruit.com/adafruit-apds9960-breakout
batteries how to choose: https://www.youtube.com/watch?v=U_Q3djsktQs
arduino tuto https://www.youtube.com/watch?v=nL34zDTPkcs + https://www.youtube.com/watch?v=p40OetppIDg bloklyduino and shields and node-red
tinycircuits https://www.youtube.com/watch?v=5bb3npa3uDI
flora vs gemma https://www.youtube.com/watch?v=bGVBR4BwIPs
https://www.youtube.com/watch?time_continue=728&v=i-ksb-gzfyE
LiPo battery + LiPo charger module to be able to easily charge through USB
Simply wrap in plastic to make rain resistant
BESTTUTO: https://www.instructables.com/id/Make-your-own-activity-tracker/ + https://github.com/godstale/retroband
soldering iron and wires
"It’s very simple to supply the power. Just connect (+) -> RAW with (-) -> GND. But if you care about recharging, you can use a Li-Po recharging module. In this case, you should connect (+) and (-) connectors on the battery with B+,B- on the recharging module, and out+, out- on the module should be connected with RAW, GND on the Arduino board respectively."
https://www.arduino.cc/en/tutorial/memory --> need to extend EEPROM
use micro-sd card reader! https://create.arduino.cc/projecthub/electropeak/sd-card-module-with-arduino-how-to-read-write-data-37f390
https://www.arduino.cc/en/reference/SD
https://docs.micropython.org/en/latest/library/machine.SDCard.html
https://docs.micropython.org/en/latest/pyboard/general.html
https://itechnofrance.wordpress.com/2019/06/21/utilisation-dune-carte-sd-en-micropython/
pyboard includes microsd https://store.micropython.org/product/PYBv1.1H#image4
micropython vs circuitpython https://www.youtube.com/watch?v=wyOcb2MHzIs
https://www.youtube.com/watch?v=iswES_5HkeM
no bluetooth or later? Because battery cosumption and need to program receiver app, usb is easier
adafruit quickstart with arduino: https://www.youtube.com/watch?v=YDa5FjnT9mw
adafruit history https://www.youtube.com/watch?v=D27U3wHN8fs
TODO: need to mount resistances to mount leds in serial (since there is no other way)? But need to be in input, is resistance needed in input? https://www.youtube.com/watch?v=nL34zDTPkcs
TODO: calculate how much battery is needed: https://www.youtube.com/watch?v=U_Q3djsktQs
TODO: choose between Arduino and MicroPython/CircuitPython
TODO: if can't succeed, just ask someone or Arduino to make such a build under opensource (including software to save as csv) and pay him. I know what sensors to use and how i will wear it (as a pendant), so not hard.
BESTTUTO on capacitors: https://www.youtube.com/watch?v=sy_G1oYRQmM
Energy for light sensors:
- Pages 22-23 for mounting RGB sensor: https://docs.broadcom.com/doc/APDS-9253-001-DS
bypass capacitor (1 micro Faraday connected between power source and device) that has a low effective series resistance (ESR) and low effective series inductance (ESI), such as the common ceramic types, which provide a low impedance path to ground at high frequencies to handle transient currents caused by internal logic switching.
After removal from the bag, the parts should be soldered within 168 hours if stored at the recommended storage conditions. If times longer than 168 hours are needed, the parts must be stored in a dry box.
Supply Current max: 154 microA in active mode, else 2 microA in standby mode
Accurate CCT, means can derive Kelvin: https://insights.regencylighting.com/what-is-correlated-color-temperature-cct-and-how-do-you-choose-it-for-your-lighting
Supply voltage 1.7V to 3.6V
27 KOhm resistor, makes output linear
see page 2 for Typical Application Circuit
Supply Current typical: 230 micro A
Appendix B: The thickness of the window should be kept as minimum as possible because there is a loss of power in every optical window of about 8% due to reflection (4% on each side) and an additional loss of energy in the plastic material.
The material of the window is recommended to be polycarbonate. The surface finish of the plastic should be smooth, without any texture.
- Total: from amperes to amperes-hours: mA * time in seconds / 3600 (1h) = mAh https://sciencing.com/relationship-between-amps-ah-12198988.html
A milliampere second (mA⋅s) is a unit of measure used in X-ray imaging, diagnostic imaging, and radiation therapy. It is equivalent to a millicoulomb. https://en.wikipedia.org/wiki/Ampere_hour
BESTTUTO CRITICAL: 1 amp-hour = 3600 coulombs = 3600 amps https://www.allaboutcircuits.com/textbook/direct-current/chpt-11/battery-ratings/
"A battery with a capacity of 1 amp-hour should be able to continuously supply current of 1 amp to a load for exactly 1 hour, or 2 amps for 1/2 hour, or 1/3 amp for 3 hours, etc., before becoming completely discharged. In an ideal battery, this relationship between continuous current and discharge time is stable and absolute, but real batteries don’t behave exactly as this simple linear formula would indicate. Therefore, when amp-hour capacity is given for a battery, it is specified at either a given current, given time, or assumed to be rated for a time period of 8 hours (if no limiting factor is given)."
"Conversely, if a very light load (1 mA) were to be connected to the battery, our equation would tell us that the battery should provide power for 70,000 hours, or just under 8 years (70 amp-hours / 1 milliamp), but the odds are that much of the chemical energy in a real battery would have been drained due to other factors (evaporation of electrolyte, deterioration of electrodes, leakage current within battery) long before 8 years had elapsed. Therefore, we must take the amp-hour relationship as being an ideal approximation of battery life, the amp-hour rating trusted only near the specified current or timespan given by the manufacturer. Some manufacturers will provide amp-hour derating factors specifying reductions in total capacity at different levels of current and/or temperature."
"Watt-hours acknowledges a battery’s voltage and amp-hours ignores it. As long as your units are consistent, either measure will work." https://sciencing.com/watt-hour-vs-amp-hour-12135955.html
"The ampere hour is frequently used in measurements of electrochemical systems such as electroplating and for battery capacity where the commonly known nominal voltage is dropped." https://en.wikipedia.org/wiki/Ampere_hour
- Easy to make a wearable with PyBoard, integrates micro sd card reader and accelerometer: https://docs.micropython.org/en/latest/pyboard/tutorial/accel.html
- BESTTUTO: how to choose correct resistor ohm, calculate with Ohm's law given the nominal voltage of the board, so can precisely reduce the current for components requiring less: https://www.youtube.com/watch?v=thLv8S9t7S0&list=PLjF7R1fz_OOXWHQhEVEI5Jqf18TQRr5Hu&index=5
- reduced voltage should be fine, just plug sensors to analog inputs Ax, then just calculate to ratio since voltage is not covering the full 0-5V band, so the input values will be ratio'ed as well: https://forum.arduino.cc/index.php?topic=558146.0 - but then also less resolution...
BESTTUTO: light sensor on arduino: https://www.youtube.com/watch?v=z9PPfE8dvGs and https://arduinogetstarted.com/tutorials/arduino-light-sensor
https://greenspector.com/en/measuring-the-energy-consumption-of-iot-using-arduino-to-measure-raspberry/
https://learn.adafruit.com/how-to-choose-a-microcontroller
kill a watt meter https://www.parkedinparadise.com/device-calculations/
https://www.edf.fr/groupe-edf/espaces-dedies/l-energie-de-a-a-z/tout-sur-l-energie/l-electricite-au-quotidien/volt-watt-ampere-les-unites-en-electricite
BESTTUTO: diode to protect circuit flow: https://www.youtube.com/watch?v=ap7edIKkykA - light emitting diodes = LED
BESTTUTO: How ICs are number with dot + how to shrinkify any arduino project: https://www.youtube.com/watch?v=30rPt802n1k&t=1s and MIT Media Lab's High-Low Tech Group and https://web.archive.org/web/20111012165316/http://blog.makezine.com/archive/2011/10/how-to-shrinkify-your-arduino-projects.html and https://web.archive.org/web/20111012194731/http://hlt.media.mit.edu/?p=1229 (using ATtiny ICs)
BESTTUTO: how to solder + buy THT (through-hole perfboard) pcb that are not printed, just dots, then can make circuits myself using soldering or jumping wires + socket to put the IC on it so we can replace it if it becomes defective + SOLDER WICK to suck soldering out and remove without breaking! + smallest ICs are made for SMD (surface-mount) boards, so these are actually the smallest boards to make wearables: https://www.youtube.com/watch?v=VxMV6wGS3NY
BESTTUTO: use safety glasses and evacuate fumes https://www.youtube.com/watch?v=JCXGjD0Rpg8
A simple guide to electronic components: https://www.youtube.com/watch?v=6Maq5IyHSuc - electrolytic capacitor round to avoid, obsolete after some time because of eletrolytes drying
- BEST: LEDs don't have a high reverse blocking voltage since they are optimized to emit light, so it's about 5V max of blocking reverse, whereas non light emitting diodes can block 1000 volts. When the threshold is trespassed, then it avalanches and actually worsen the circuit.
- use zener diodes for voltage regulation, ie, reduce voltage to exactly the amount required in the circuit
- transistors and mosfet are amplifiers of ampers and voltage
- voltage drop (such as with diodes, transistors etc) produces heat dissipation, unless there is very low impedance hence no voltage drop. Mosfet are such low impedance components, but because of that they are not as robust as traditional transistors.
- Watts = I * V, same as Ohm's law: V = I * R, another triangle.
- oversize resistor: take more ohm and wattage to dissipate more heat and be more robust
- electrolytic capacitor is flammable, prefer ceramic or film (polypropylene) or round aluminium polymer (solid electrolytes) capacitors: https://www.youtube.com/watch?v=2v8zBj7_sxg
- Inductors + electron flow (minus to plus) vs conventional flow (plus to minus) conventions: https://www.youtube.com/watch?v=KSylo01n5FY
- BESTTUTO on capacitors and how to handle safely and to mount in circuit (need to mount in parallel) - striped face is negative sign: https://www.youtube.com/watch?v=X4EUwTwZ110
etain Solder wire - Low vs High Quality https://youtu.be/5Ku7I3hA3AA
TOBUY:
- battery LiPo 200 mAh?
- battery charger through USB
- breadboard to easily do tests, and breadboard wires (jumpers)
- resistors, 4 10KOhm + one 27 KOhm
- bypass capacitor in ceramic 1 micro farad x2 and 10 micro farad for both sensors
- starter kit with lots of resistors and leds etc maybe?
- buy leds and diodes, at least 6, to mount in serie to reduce voltage? https://forum.arduino.cc/index.php?topic=20967.0
- micro sd card breaker (reader)
- micro sd card of a few gb
- the 2 photosensors APDS-9007 and APDS-9253
- soldering iron + solder + solder wick + safety glasses
- multicolor LED to signal battery level (adalogger already has the peripherals necessary to report battery)
- TODO: finish https://www.youtube.com/watch?v=6Maq5IyHSuc and https://learn.adafruit.com/how-to-choose-a-microcontroller and battery measure
According to MCHobby about LiPo batteries:
Ces accus sont conçus pour l'alimentation de projet électronique et pas pour la propulsion de moteur. L'accu est équipé d'un circuit de protection désactivant l'accu si sa tension chute en dessous de 3V ou si le courant débité est trop important.
Le courant de décharge de ce type d'accu est de 0.5C à 1C MAX!
Par exemple: un accu de 500mAh 1C pourrait produire un courant de 1x500mA = 500mA max.
Certains accus pour modélisme sont capables de délivrer jusqu'à 35C!
Ex: un accu de 2500mAh 35C pourrait produire un courant 35x2500mA = 87500mA = 87.5A sans broncher! De quoi assurer le démarrage de n'importe quel type de moteur.
Attention cependant, ces accus ne disposent d'aucune protection et peuvent donc prendre feu s'ils ne sont pas utilisés/chargés/déchargés correctement.»
Pycom Pyscan, Pyscan Accelerometer Sensor, Barometric Pressure Sensor, Light Sensor, Temperature & Humidity Sensor 37€ https://befr.rs-online.com/web/p/sensor-development-tools/1720649/
DIY 5Kohm resistor with paper and graphite pencil: https://makecode.adafruit.com/learnsystem/pins-tutorial/devices/make-a-resistor#input-resistor
Capacitors: https://makecode.adafruit.com/learnsystem/pins-tutorial/devices/capacitors
- BESTTUTO capacitors: https://learn.adafruit.com/circuit-playground-c-is-for-capacitor/what-is-a-capacitor
- "Unlike a resistor, a capacitor does not dissipate energy. Instead, a capacitor stores energy in the form of an electrostatic field between its plates."
- "Capacitors are widely used in electronic circuits for blocking direct current while allowing alternating current to pass."
- Solar kit: https://www.adafruit.com/product/390